What is Tie Dye?
Tie dye is a classic DIY craft creating vibrant, unique patterns on fabric by folding and dyeing․ It’s perfect for crafting personalized designs and gifts․
What is Tie Dye?
Tie dye is a creative DIY technique involving folding, binding, or twisting fabric to create unique patterns before dyeing․ It allows for vibrant, personalized designs, making it ideal for crafting customizable clothing, accessories, and gifts․ Suitable for all skill levels, tie dye is a fun and versatile craft for individuals and families alike․
History and Popularity of Tie Dye
Tie dye has ancient roots, with techniques like shibori and bandhani practiced globally․ It gained popularity in the 1960s and 1970s as a symbol of counterculture․ Today, tie dye remains a beloved DIY craft, offering endless creative possibilities and a nostalgic charm․ Its resurgence in fashion and home decor highlights its timeless appeal and versatility․
Why Tie Dye is a Great DIY Project
Tie dye is an excellent DIY project for all skill levels, offering creative freedom and customization․ It’s budget-friendly and eco-conscious, repurposing old items into unique designs․ Families and individuals love its hands-on, artistic process, making it a fun and rewarding activity for crafting personalized clothing, gifts, or home decor․
Materials Needed for Tie Dye
Essential supplies include rubber bands, dye powder, gloves, a bucket, soda ash, and a thermometer․ Protective gear and a covered workspace ensure safety and success․
Essential Supplies
To begin, gather rubber bands, dye powder, gloves, a bucket, soda ash, and a thermometer․ These basics ensure proper dye binding and safety․ Cover your workspace with plastic for easy cleanup and avoid stains․ Always wear protective gear to handle chemicals safely and achieve the best results․
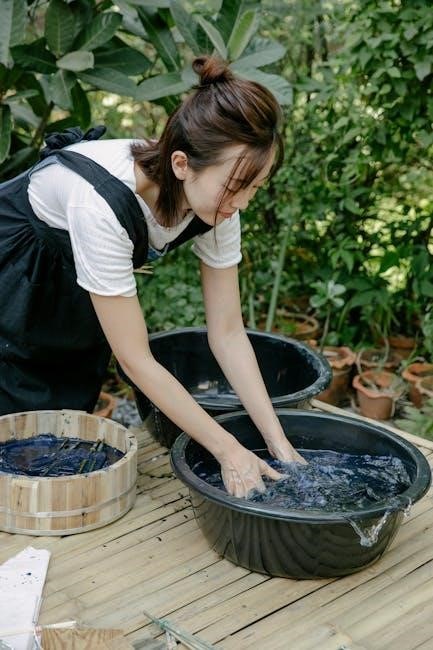
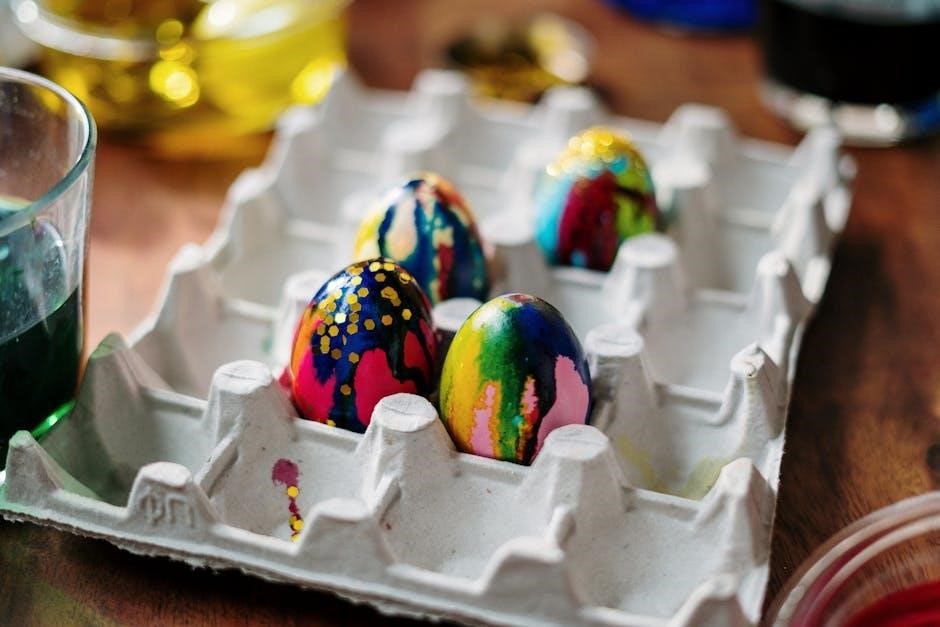
For intricate designs, consider adding squeeze bottles, syringes, or spray bottles to apply dye precisely․ Shibori tools or folding clamps can help create unique patterns․ Bleach or discharge pastes offer reverse dye effects, while stencils add artistic details․ These tools expand your creative possibilities for complex and professional-looking tie-dye projects․ They enhance precision and versatility in your designs․ Always use them carefully to achieve desired effects․ Protective gear is essential for a safe tie-dye experience․ Use rubber gloves to prevent skin staining and old clothes or aprons to shield against dye splatters․ Safety goggles protect eyes from accidental dye contact․ A face mask can reduce inhalation of dye powders․ Cover your workspace with plastic or newspaper to avoid permanent stains․ Stay safe and organized while creating vibrant designs․ Start by washing and drying fabric․ Fold, bind, or twist to create patterns․ Apply dye evenly, let it set, then rinse gently and wash separately for vibrant results․ Start by washing and drying the fabric to remove finishes․ Lay it flat or dampen for easier folding․ Cover your workspace with plastic or newspaper․ Wear gloves and old clothes to protect against stains․ Gather all supplies, including dye, rubber bands, and buckets․ Ensure the area is well-ventilated for safe dye handling and minimal mess․ Popular folding methods include the spiral, stripes, and accordion folds․ For a spiral, pinch the center and twist fabric into a flat coil, securing with rubber bands․ Stripes involve folding the fabric into straight lines or pleats․ Accordion folds create a zigzag effect by folding the fabric back and forth․ Each technique ensures unique, eye-catching patterns when dyed․ Once folded, apply dye evenly using squeeze bottles or buckets․ For vibrant colors, ensure fabric is damp and dye covers all areas․ Gently squeeze dye into folds to penetrate deeply․ For multi-color effects, layer dyes carefully․ Allow the fabric to sit for 6-8 hours, then rinse thoroughly and remove rubber bands before washing․ Explore intricate folding, layering, and reverse dyeing for unique patterns․ Techniques like spiral twisting and multi-color blending create stunning, professional-looking designs for experienced crafters․ Experiment with spiral twists, folded layers, and multi-color techniques to craft distinctive designs․ Spiral twisting creates swirling vortex effects, while layered folding produces intricate geometric shapes․ Multi-color dyeing allows vibrant hues to blend uniquely, resulting in one-of-a-kind patterns that captivate the eye and add personal flair to fabric projects․ Exploring various dye colors enhances creativity and visual appeal in tie-dye projects․ Mixing bold primaries or soft pastels creates unique effects․ Multi-color dyeing allows vibrant hues to blend, while ombre techniques transition smoothly between shades․ Experiment with color combinations to achieve striking contrasts or harmonious gradients, ensuring each project reflects personal style and artistic vision․ Layering techniques in tie-dye allow for intricate, multi-dimensional designs․ Apply dye in stages, letting each layer set before adding the next․ Re-fold or re-tie fabric between layers for unique patterns․ This method creates depth and complexity, enabling bold contrasts or subtle gradients․ Experiment with layering to achieve standout, professional-looking results in your tie-dye projects․ Always wear protective gloves and eyewear when working with dyes․ Ensure good ventilation and avoid inhaling dye powders․ Cover your workspace with plastic or old sheets to prevent staining․ Handle bleach and chemicals with extreme care, following instructions precisely to avoid accidents․ When using dyes, always read and follow the instructions carefully․ Wear protective gloves and eyewear to avoid skin and eye irritation․ Work in a well-ventilated area to prevent inhaling dye fumes․ Keep dyes away from children and pets․ If using bleach or chemicals, handle them with caution and ensure proper ventilation to maintain safety․ Protect your workspace by covering it with plastic sheets, newspaper, or a drop cloth to prevent dye spills․ Use disposable gloves to avoid staining your hands․ Contain the dyeing area to minimize mess․ Elevate your project on a wire rack or tray to catch excess dye․ Clean up immediately if spills occur to avoid permanent stains․ When using bleach or chemicals in tie-dye, wear protective gloves and goggles․ Work in a well-ventilated area, preferably outdoors․ Neutralize bleach with vinegar if needed․ Avoid mixing chemicals, and follow instructions carefully to prevent accidents․ Bleach can weaken fabrics, so test on scraps first․ Rinse thoroughly and dispose of chemicals safely․ Create a tie-dye printable guide with step-by-step instructions and diagrams․ Include material lists, folding techniques, and dyeing tips․ Customize the layout for clarity and share easily with others․ Design a clear, printable tie-dye guide with step-by-step instructions․ Include photos of folding techniques, dye colors, and safety tips․ Use bullet points for easy reading and organize sections logically․ Ensure the layout is visually appealing and printer-friendly, making it perfect for sharing with DIY enthusiasts of all skill levels․ Add space for notes or customization ideas․ Start with a clear introduction and list of materials․ Break the process into numbered steps, including preparation, folding, dye application, and washing․ Use photos or illustrations for visual clarity․ Highlight tips for achieving vibrant colors and avoiding common mistakes․ Add optional techniques like layering or reverse dyeing for advanced users․ Keep instructions concise and organized, ensuring each step is easy to follow and understand․ Include a section for troubleshooting and encourage experimentation with unique patterns․ Make sure the guide is visually appealing and easy to print․ Conclude with care instructions to maintain the design․ Allow space for notes or variations․ This format ensures a comprehensive yet user-friendly guide for all skill levels․ Encourage creativity and fun while tie-dyeing! Share your tie-dye guide on social media, craft websites, or forums․ Use platforms like Pinterest or Instagram for visual appeal․ Attach the guide to email newsletters or blog posts․ Encourage users to download and share with friends․ Include a comment section for feedback or questions․ Make it accessible by ensuring it’s mobile-friendly and easy to print․ Highlight key steps with images for clarity․ This fosters a creative community and helps others enjoy tie-dyeing․ Ensure proper formatting for different devices and consider offering translations for broader reach․ Add a QR code linking to video tutorials for additional support․ Regularly update the guide based on user input to keep it relevant and helpful․ Sharing your guide helps inspire others to explore the fun and artistic world of tie-dye! Address uneven dye distribution by checking folds and dye application․ Fix color bleeding by rinsing thoroughly․ Correct folding mistakes by redoing ties before re-dyeing․ To fix uneven dye distribution, ensure fabric folds are tight and even․ Check dye application for consistency, and avoid over-saturating․ Gently redistribute dye with gloves if needed․ Uneven patterns can often be corrected by re-tying or adjusting folds before reapplying dye․ Proper binding and soaking times also help achieve balanced results․ To minimize color bleeding, wash tie-dyed items separately in cold water initially․ Use a color-catching sheet or vinegar in the wash to lock colors․ Avoid using hot water, as it accelerates dye migration․ For stubborn bleeding, consider re-dyeing or using fabric sealants to stabilize the colors and prevent further fading․ If your folds are too loose, causing uneven dye distribution, tighten them before applying dye․ For over-tight folds creating excessive resist areas, gently adjust for a more natural pattern․ Wash and re-dye if needed․ Always double-check folds before dyeing to ensure desired results and minimize corrections later․ To preserve vibrant colors, wash tie-dyed items in cold water with mild detergent․ Turn inside out to protect the design․ Air dry flat to prevent shrinking․ Store in a cool, dry place to maintain fabric quality․ For tie-dyed items, turn inside out and wash in cold water with mild detergent to protect colors․ Avoid bleach or harsh chemicals․ Air dry flat or hang to prevent shrinking․ Do not machine dry, as heat can fade colors․ Iron inside out if needed․ Store in a cool, dry place to maintain vibrancy․ To keep tie-dye colors bright, wash items inside out in cold water with mild detergent․ Avoid bleach or harsh chemicals, as they can fade colors․ Air dry or tumble dry on low heat․ Iron inside out on low heat if needed․ Store in a cool, dry place away from direct sunlight to preserve vibrancy longer․ Store tie-dyed items in a cool, dry place away from direct sunlight to prevent fading․ Use breathable storage bags or cloth covers to protect the fabric․ Avoid folding items in a way that causes creases, as this can damage the design․ Keep items clean before storing to maintain color vibrancy and fabric quality․ Tie dye is a fun and creative project for all skill levels, allowing you to craft unique designs on clothing, accessories, and gifts․ Perfect for family activities, it encourages experimentation with colors and patterns, making it an ideal DIY craft for personal expression and personalized items․ Tie dye is perfect for various events, from summer festivals to birthday parties․ It’s a great way to create unique outfits for music festivals, beach trips, or casual gatherings․ Additionally, tie-dye projects make thoughtful DIY gifts for holidays or special occasions, allowing for personalized and meaningful creations that showcase creativity and self-expression․ Tie dye is an excellent way to personalize clothing and accessories, creating one-of-a-kind designs․ From shirts and scarves to bags and socks, this technique allows you to add unique touches to everyday items․ By experimenting with folds and colors, you can craft custom patterns that reflect your style and creativity, making each piece truly special․ Tie dye is a fantastic way to create personalized DIY gifts and crafts․ From vibrant scarves to unique baby clothes, this technique allows you to craft thoughtful presents․ Use folding methods and colorful dyes to design one-of-a-kind items․ With simple steps, you can make memorable gifts for friends and family, adding a personal touch to any occasion․ Thank you for exploring our tie dye guide! With these steps, you’re ready to create vibrant designs․ Experiment, have fun, and happy crafting—your next project awaits! For a successful tie dye project, always pre-wash fabrics to remove finishes․ Fold and bind tightly for crisp patterns․ Apply dye evenly, saturating both sides․ Wait 6-8 hours before rinsing․ Wash separately first to prevent color bleeding․ Stay creative, experiment with folds, and enjoy the unique results of your handmade designs! Embrace creativity and try new techniques—tie dye thrives on experimentation! Mix colors, explore unique folds, and layer dyes for one-of-a-kind designs․ Don’t fear mistakes; they often lead to stunning, unexpected patterns․ Whether you’re a beginner or seasoned crafter, every project is an opportunity to innovate and create something truly personal and special․ Explore online tutorials, guides, and inspiration for tie dye projects․ Websites like Pinterest offer step-by-step instructions and visual ideas․ FaveCrafts․com provides detailed tutorials and patterns․ Additionally, crafting blogs and YouTube channels share advanced techniques, troubleshooting tips, and creative ideas to enhance your tie dye skills and projects․ These resources will help you master tie dye and explore new creative possibilities! Frequently Asked Questions about tie dye include common concerns, troubleshooting tips, and resources for successful projects, ensuring a smooth crafting experience with helpful guides․ Common questions about tie dye include inquiries about techniques, color choices, and care instructions․ Many ask about preventing color bleeding, achieving vibrant patterns, and fixing mistakes․ Others seek advice on suitable fabrics, dye types, and necessary supplies․ These questions are essential for ensuring successful and long-lasting tie-dye projects with professional results․ Troubleshooting common tie-dye issues involves addressing uneven dye distribution, color bleeding, and folding mistakes․ Tips include using high-quality dyes, ensuring proper folding, and washing items separately․ Advice often covers pre-washing fabrics, using protective gear, and allowing sufficient time for the dye to set․ Following these guidelines helps achieve professional-looking results and vibrant, long-lasting colors․ For further learning, explore FaveCrafts․com and Pinterest for printable guides, tutorials, and inspiration․ These platforms offer step-by-step instructions, advanced techniques, and creative ideas to enhance your tie-dye projects․ Utilize these resources to refine your skills and explore new methods for achieving stunning, unique designs․Optional Tools for Advanced Techniques
Protective Gear
Step-by-Step Tie Dye Instructions
Preparation Steps
Folding Techniques
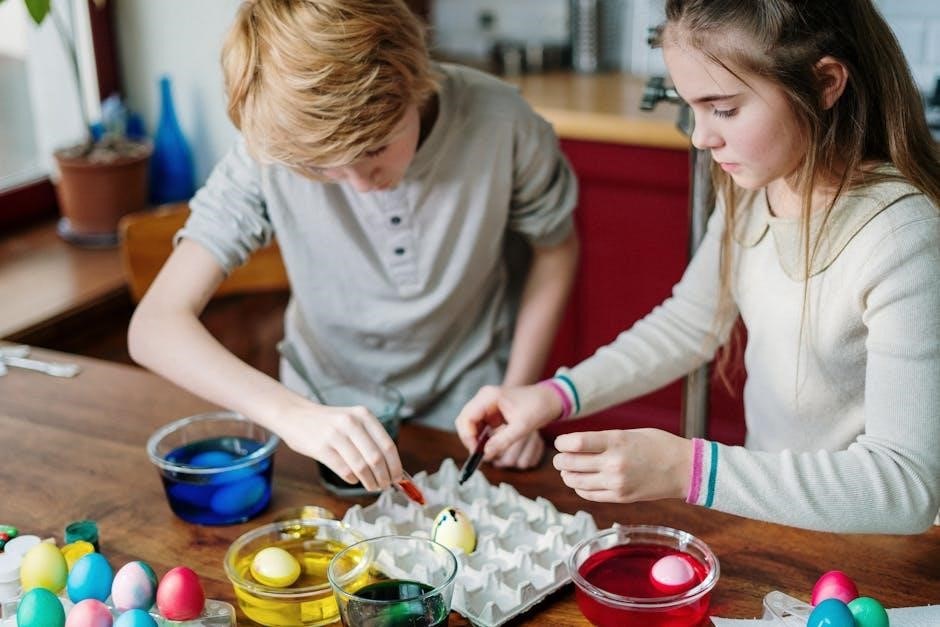
Applying the Dye
Advanced Tie Dye Techniques
Creating Unique Patterns
Using Different Dye Colors
Layering Techniques
Safety Precautions
Working with Dyes Safely
Protecting Your Workspace
Handling Bleach and Chemicals

Printable Tie Dye Guide
Creating a Printable Instruction Sheet
Designing a Step-by-Step Guide
Sharing Your Printable Guide
Troubleshooting Common Issues
Fixing Uneven Dye Distribution
Dealing with Color Bleeding
Resolving Folding Mistakes
Tie Dye Care Instructions
Washing and Drying
Maintaining Vibrant Colors
Storing Tie-Dyed Items
Fun Tie Dye Projects
Tie Dye for Different Occasions
Customizing Clothing and Accessories
DIY Gifts and Crafts
Final Tips for Success
Encouragement to Experiment
Resources for Further Learning
Frequently Asked Questions
Common Questions About Tie Dye
Troubleshooting and Advice
Additional Resources